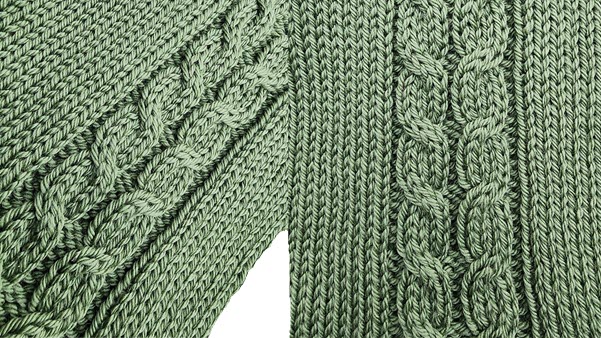
. . Well, hello there.. . Let's talk about cables.. . This is a do-over from this. morning's live session.. . I had a bunch of technical difficulties.. . What else is new?. . The recording didn't take,. my microphones weren't syncing correctly,. . and who knows what all else went wrong.. . I'm going to go ahead and rerecord. this and talk about cables.. . Now, why should hand knitters. have all the fun with cables?. . We can create such beautiful,. beautiful stitch patterns with cables,. . texture with our knitting machine.. . And yeah, it's a little harder to do. on the knitting machine,. . but it's definitely doable.. . As I'm talking today, and any time I. do any a presentation or a recording.. . If I use a term that you don't understand,. please, please, please hit knititnow.. . Com/glossary.. . There are hundreds of entries there.. . Machine Knitting has. a language of its own.. . Broke my heart earlier this week.. . Someone wrote and said that she was. struggling because I had used a term she. . didn't understand,. she didn't know what to do next.. . I asked her if she had gone. to the glossary and she said, Oh,. . she had forgotten about the glossary.. . So this is a gentle reminder to use. the glossary if I use a term. . that you don't understand.. . When we talk about cables,. we'll go back to the three questions. . that we use anytime we talk about using. hand knitting patterns or hand knitting. . stitch patterns or knitting patterns.. . Is it possible Is it possible to make. cables on our knitting machines?. . Absolutely.. . Is it practical?. . Most of the time, yes.. . But the question you need to ask yourself,. is the stitch pattern. . that you're looking at practical?. . If the stitch pattern is twisting cables. or twisting stitches or making you stand. . on your head in order to make the thing. happen, it's probably not. . going to be practical for you.. . Is there a whole lot of pearl stitches. involved, which would mean. . a whole lot of hand manipulation?. . Probably not practical.. . The biggest question is,. are you willing to do it?. . Are you willing to take the time to cross. cables for a whole sweater and. . You'll get beautiful results,. but is it worth it to you?. . That's up to you.. . For example, we've got this man's sweater. here, and I'm sorry,. . the picture is a little bit dull.. . It's hard to see,. but he has a big old cable panel right. . down the center front of the sweater,. down the center back, down the sleeves,. . and on either side of that big old. cable pattern are more small cables.. . So this whole sweater is cables.. . Is it possible?. . Sure.. . Is it practical?. . Probably not.. . Are you willing to do it?. . Not me.. But maybe you're willing to do it.. . Ask yourself those questions. before you plan a cable project.. . Let's do a definition.. . What is a definition of cables?. . Cables are decorative,. textured patterns created by crossing. . groups of stitches over each other,. forming twists or braids in your fabric.. . I like to think of cables as knitting. stitches out of order.. . So let's say you're doing a four stitch. cable and you normally would knit. . stitch one, two, three, and four.. . To work a cable, you might knit stitch. three and four and then one or two.. . And what you'll be doing is knitting those. stitches out of order We're forming some. . texture on your fabric, on your knitting.. . More than likely,. you're going to find cable patterns. . in the hand knitting world. and the instructions that they had a lot. . of hand knitting,. especially the older hand knitting. . patterns, will be text. instructions like this.. . Slip one to a DPN.. Oh, my gosh.. . There we go with those. abbreviations again.. . A DPN, double point needle or. a cable needle, and hold it in back.. . Knit one, knit a stitch. from the a double-pointed needle,. . slip the next stitch to a double pointed. needle, hold it in front, knit one,. . on and on and on and on and on. . A eight-stitch pattern is not going. . to work for you unless there's a chart.. . Speaking of charts, charts come. in all different shapes and sizes.. . Here's an example of one,. and I think this might be an older example. . of a very simple. eight-stitch cable pattern.. . And actually it's two four stitch cables.. . The right section here is,. you can see a hill and a valley.. . That hill and valley symbol is telling you. there's four boxes which. . represent four stitches.. . The hill and valley are telling you. that you're going to be transferring two. . stitches in one direction or the other,. and the hill and valley is. . giving you that direction.. . The green, it'd be just the opposite.. . Again, four boxes, four stitches,. two stitches being transferred. . and knit out of order.. . In the yellow section is a symbol. that is just a horizontal line.. . This represents a pearl stitch.. . Think of this pearl stitch as the pearl. bump as it's facing you. . on your knitting machine.. . Another example of a stitch. pattern for cables is this.. . This is maybe a little bit more modern. style of stitch pattern, cable pattern.. . You'll notice that there is. an open section here.. . This open solid lines. represented by the green here would be the. . stitches that you would take off first.. . Behind that would be. the other two stitches.. . So this is, again, is a four-stitch cable.. . You're going to take two stitches off,. take two stitches off, reverse them,. . and then knit them out of order.. . So thinking. about solid lines are the stitches you. . take off first, you transfer first,. and the broken lines are. . the stitches you transfer second.. . Again, you've got horizontal lines for. perl stitches on each side of this cable.. . And with these symbols,. you've got vertical lines going up. . and down, which represent knit stitches.. . So there's no manipulation. of those stitches.. . They just knit as you knit. between your cable crossings.. . Here's that same stitch pattern again.. . Again, it's a four-stitch cable.. . And you'll notice I've drawn some arrows. showing you the direction of. . the transfers.. . Open lines, those open areas,. which was the green in the previous image,. . transferring to the left and transferring. to the right, which brings up. . something that you need to think about.. . If you've gotten a chart from the hand. knitting world, a hand knitting pattern or. . book,. more than likely that cable chart is. . written four hand knitters. with the knit side facing.. . We don't knit that way.. . We knit with the pearl side facing.. . So we're going to need to, in our minds,. translate that to the right. . and left crossing.. . It gets a little confusing.. . Machine knitters,. we've got this superpower of being able. . to think in reverse because we're looking. at our knitting from the backside,. . which is what hand knitters do not.. . They always think the other way around.. . So if you're using a stitch pattern. that is a hand knitting stitch pattern,. . be aware of the direction of the transfers. and then subsequently the direction,. . the lean of the cable,. which direction it's going to go.. . And more than likely,. if it's a hand netting pattern,. . you're going to have to reverse everything. for yourself as to which. . direction they come in.. . Now, for something really simple like. this, what difference does it make if. . they're leaning left or leaning right?. . Well, it would make a difference if you. were doing this cable pattern, this arrows. . in, arrows out here, the left side one.. . You can see that we've got one. leaning right and one leaning left.. . It gives those arrows pointing up.. . So if you did them backwards,. you would have one leaning.... . It would have these stitches leaning. in the opposite directions and you would. . have a cable and arrows down cables. designed instead of an arrows up.. . So it can be important which way it's. leaning depending on the stitch pattern.. . So something to keep in mind,. use your machine that are super. . powers and turn things opposite.. . Now, here is a really,. really overwhelming cable pattern.. . And I pulled this out of a hand knitting. book, and you can see there are a lot. . of horizontal lines there,. which means a lot of pearl stitches.. . Translated for us, that means. a A lot of hand manipulation.. . Go back to, are you willing?. I'm not.. . I wouldn't be willing to knit this. on the machine.. . I definitely would pick up my hand. netting needles and knit this.. . But don't be overwhelmed when you see. something like this because it's. . really only the same four symbols.. . You've got a left leading cross,. a right leading cross.. . You've got horizontal. lines for pearl stitches.. . You've got vertical. lines for knit stitches.. . So distill anything complicated like this. down to its basic symbols. . to make your decision.. . Is it possible?. . Is it reasonable?. . And are you willing to do it?. . So don't get overwhelmed by something. that you see that might look like this.. . All righty, so this is where. my technology failed earlier.. . I'm going to go ahead. and do a little demo here.. . So I'm going to cross two cables,. . move two stitches, Turn it this way.. . Turn it this way, whichever works for you,. and pull off two more. . stitches and cross them over.. . So we're going to be knitting. these stitches out of order.. . Now, notice they're a little. hard to get back on.. . Want to use your fingers,. whatever you need to do.. . Now, you also notice that. . I'm going to try a three-stitch cable.. . This time, when I try and cross this over,. you'll see that there's a lot. . of stretching going on here.. . It's going to be really hard to get those. stitches over where they need to go.. . So I'm going to put them back on for now.. . What I'm going to do is drop a stitch. on either side. . Now you'll notice that as I'm dropping. these stitches, I'm giving myself a lot of. . slack so that I can now cross this cable.. . You see there's a lot more slack over here. so that I can now cross that cable without. . a whole lot of stretching going on.. . You might be tempted at this point to pull. these needles all the way out,. . but can you see that the needles are being. somewhat distorted because. . they're stretched there?. . So don't do as I did.. . Make sure you keep your work. in your needles in work.. . Now we can latch those. . stitches back up again.. . I'm just going to go ahead and pick this. stitch up from down below. . and latch the stitch up.. . What I'm doing is I'm. creating perl stitches.. . You can see that this needle is. in the opposite direction from the rest. . of the needle, so it's going to form. stitches in the opposite direction.. . So we talked about. symbols and instructions.. . We're going to be talking about. pearl accents at this point.. . This is a cable, two stitch cable that I. turned without any pearl. . stitches on the side.. . Okay, there's some texture there,. and yeah, it's not too impressive.. . However, pop, here we go.. . We've got pearl stitches on either side.. . What a difference.. . It really, really makes. these cables stand out.. . So this is what I mean by popping. . the cables off and really is. . the key to success with cables.. . How do we create perl stitches?. . We can do what I just did there,. drop some stitches and re reform them.. . You could leave a needle out of work. when you first start working your cables.. . Just leave a needle out of work. and just don't do anything else.. . You could leave and need a lot. of work and reform those stitches.. . So you could leave ladders. on the side or reform the stitches.. . You can also use your ribbon.. Now, we do.... . In the past, I have always said, Oh,. just put some ribbon needles. . up and use your ribbon.. . Well, that sounds really good in theory,. but until you try I'm not sure. . that's really the best solution.. . Now, you might disagree with me,. but trying to cross cables while you've. . got your ribbon in work,. you've got ribbon gate. . pegs in place, you've got your main bed. gate pegs in place and you're trying. . to transfer stitches like I just did.. . Oh, my gosh, it can really be hairy.. . You could also transfer cables. on the ribbers, on the ribberside,. . which to me is really backwards because. you're really going. . to be working backwards.. . I did a whole video on that that's. in the cables classroom,. . and you can take a look and watch me. struggle and make a decision for yourself,. . whether you're willing to do that,. to put some cable needles up into work. . to put those cable, those. perl stitches between the cables.. . You have to try it for yourself.. . Here we're talking about. relatching stitches.. . If you haven't done this,. it's a great way If you add. . pearl stitches to your knitting.. . Maybe you just want some columns of pearl. stitches and not even worry about cables,. . just add some texture. with some pearl stitches.. . That works as well.. . You can also turn a column of pearl. stitches for a turning row.. . If you've got a. facing that you want to have a nice. . turning edge on, you could just. do a column of pearl stitches.. . So it's another trick.. . Color Block Cables is the tip. of the week this week.. . We I have a video that I. hope you will take a look at.. . This was a fun, fun, fun project. that was just a pillow top that I made,. . and it was two colors.. So it's Intarsia.. . Now, again, if you don't know. Intarsia, go to the glossary.. . But But intarsia is knitting. two colors in a row.. . In this case, I would knit that bright. green, and then I would drop. . the bright green and knit the teal.. . On the way back, I would knit the teal,. drop the teal, and knit the bright green.. . Each section would be knit. separately in an intarsia method.. . But what I did, instead of having just. a join of the two colors together,. . I added a cable in between,. which really added a nice,. . not only texture, but a graphic. element as well to the front of this.. . So if you can take a look at this week's. Tip of the Week, the video is also in the. . classroom for color blocks with cables.. . Now, someone that's Pauline this morning. said, boy, that seems like an awful. . lot of work for some texture.. . And she's right,. it is an awful lot of work.. . Is it possible?. Yes.. . Is it practical?. Maybe.. . Do you want to do it?. Maybe not.. . And I think Pauline this morning decided,. no, Probably she wasn't convinced anyways.. . That's fine.. So we can add.. . The whole idea here is to add. texture to our knitting.. . There's other ways of adding. texture to our knitting.. . How about slip?. . I love this slip stitch in that turning it. degrees and knitting a sideways knit. . sweater looks like I've got cables. running up and down my sweater.. . So using this slip or a slip that's. similar to it that makes it. . look like cables looks great.. . How about tuck?. . Tuck is one of the best ways. to get texture in your knitting.. . This particular tuck pattern is. . the diamond shapes also looks like cables.. . You could incorporate the big Xs. . of the tuck and put some cables in where. . those diamonds are in the middle there.. . So you could mix and match.. . It's just another thought of way of adding. . some different texture to your knitting.. . I mentioned the classroom.. . Let me go to our classroom.. . We go to Learn and Classrooms.. . We do have a whole classroom. on cables right here.. . Here.. . The videos are in the beginning here.. . We also have a few tutorials on cables. in Designinit,. . and a link to the Stitchdesigner. at learnmachinenitting.. . Com.. Com.. . Excuse me, at learndesigninit.. Com.. . At learndesigninit.. . Com, there's a course called. Stitch Designer that goes into real. . depth about creating cables in Designinit.. . Now, Designinit Designinit, cables. in designinit can be a little funky.. . That whole element in Designinit is really. powerful, and it does a really,. . really great job of giving you charts.. . You're not going to be able to.... . It's not something you're going. to download to your machine.. . However, it does give you charts. for manipulating cables, and Designinit. . does a fabulous job with it.. . It is a little funky in figuring out how. to do it, so that course,. . Stitchdesigner@learndesigninit.. . Com, would help you.. . Here's the Skill Builder challenge.. . Go to Learn and Skill Builders.. . There's the challenge down here that is. cables on the machine.. . It has a lot of information. about cables in here.. . Plus, most importantly, it gives you some. exercises on how to knit some cables.. . Some examples of cast on stitches,. knit two rows, cross a cable, and we show. . you how, and she give you the diagram.. . So there's a lot of good exercises here. for you to try so that you can make up. . your mind whether you want to even try.. . If you even want to try cables or. incorporate cables, this gives you a quick. . and easy way to be convinced. that they're for you or they're not.. . So that's the challenge.. . All right.. . A number of things I talked about today. had to do with they were. . available for members only.. . The Skill Builder is. available for premium members.. . The Tutorials are available for members.. . And this replay will be. available for a while.. . Any of the past replays will. be available for members only.. . We did do this topic earlier as a live. a couple of years ago, actually.. . And you might want to take. a look at that one.. . I'll put a link to that in the show notes.. . Show notes will be here on this same. page where you're watching this video.. . And there'll be jump links as well so. that you can jump through any of the chat. . stuff that's going on here. or any of my booboo's.. . And you can also have links to some. of the things that I've talked about.. . So if you are interested in a membership,. I really encourage you to become a member,. . take advantage of everything. that Knitted Now has to offer,. . not only just cables,. because you may have already decided you. . don't want any part of cables,. which is fine, but all the other things. . that we have to offer, the glossary,. all the patterns, all the tutorials,. . the classrooms, all the good. stuff that you get as a member.. . We're offering this. week a trial, knititnow.. . Com/trial.. . This is an extended trial. for just this week only.. . It's two weeks for $.. . That $ then applies to when you. decide to become a full member.. . We normally offer a five-day trial.. . This one gives you a full two weeks. to peek behind the curtain. . and see what we have to offer.. . So I hope you will consider. becoming a member of Knitit Now.. . Thank you for watching this video,. and we'll see you next month, March.. . Spring is springing, and we'll see. you when the sun shining in March.. . Happy knitting, everyone..